
COMPLETING A PRESENTATI ON WITH MEDIA AND SPECIAL EFFECTS
GETTING STARTED
- Save the file SC_PPT365_2021_CS1-3a_FirstlastName_l .pptx as
SC_PPT365_2021_CS1-3a_FirstlastName_2.pptx
- Edit the file name by changing “l” to “2”.
- If you do not see the .pptx file extension, do not type it. The file extension will be added for you a utomatica lly.
- To complete this Project, you will a lso need the following files:
- Support_PPT365_2021_CS1-3a_Mansion.jpg
- Support_PPT365_2021_CS1-3a_Map.png
- Support_PPT365_2021_CS1-3a_Slides.pptx
- With the file SC_PPT365_2021_CS1-3a_FirstlastName_2.pptx open, ensure that your first and last name is displayed in the presenter notes on Slide 1.
- If the presenter notes do not display your name, delete the file and download a new copy.
PROJECT STEPS
1. As a member of the Planning Department in Santa Rita, Ca lifornia, you are developing a presentation about historic preservation to give to neighborhood groups and other interested residents.
Reuse the slides from the file Support_PPT365_2021_CS1-3a_Slides.pptx
and insert them in the same order at the end of the presentation.
- Change the design of the presentation as follows to use the theme and colors the department uses for a ll of its presentations:
- Change the theme to Office.
- Change the theme colors to Red.
- Insert a footer as follows to identify the depa rtment throughout the presentation:
- Include the slide number in the footer.
- Enter Santa Rita Planning Department as the footer text.
c. Display the footer on a ll slides except the title slide.
- On Slide 1(“Historic Preservation Plan”), enter Santa Rita, CA in the subtitle placeholder to provide a subtitle for the presentation.
- On Slide 2 (“Purpose of the Plan”), insert a picture as follows to add visua l interest:
- Use the content placeholder on the right to insert the picture in the file
Support_PPT365_2021_CS1-3a_Map.png.
- Crop out the da rk red rectangle at the bottom of the picture.
- With Slide 2 still displayed, format the bulleted list as follows to improve its organization and appearance:
- Delete the list item “Forest Road”, which is not a historic district.
- Increase the indent of the list items “Mansion Cove”, “Overlook Ridge”, and ” Pioneer Square” in the bulleted list.
c. Change the font color of the entire list to Dark Red, Accent 1, Darker 25% (5th column, 5th row in the Theme Colors Palette).
d. Bold the level-1 list items (“Identify landma rks.”, “Identify historic districts:”, and “Answer the questions:”).
- Remaining on Slide 2, animate the text on the slide as follows to make the content more engaging:
- Animate the content placeholder on the left using the Fly In Entrance animation.
- Animate the text All at once.
c. Change the direction of the animation to From Left.
d. Change the Duration to 1.00 second to give the a udience time to read the text.
- On Slide 3 (“Plan Review Steps”), insert Sma rtArt as follows to make the four review steps more vivid:
- Convert the bulleted list to the Basic Timeline SmartArt in the Convert to SmartArt ga llery.
- Change the SmartArt style to Moderate Effect.
- With Slide 3 still displayed, add the following slide note:
Request feedback from city residents.
- On Slide 4 (“Residential Historic Districts”), format the picture in the center of the slide as follows to suit the slide design:
- Resize the picture to a width of 3″.
- Align the bottom of the picture with the bottom of picture 4 (the first Overlook Ridge picture).
c. Align the right side of the picture with the right side of picture 2 (the second Mansion Cove picture).
d. Apply the Simple Frame, Black picture style.
- With Slide 4 still displayed, modify the animations of the pictures as follows to make them more consistent and smoother:
- Apply the animation applied to picture 4 to picture 5.
- Select all the pictures and change the Sta rt setting to After Previous so that the animations play one after the other.
- Remaining on Slide 4, insert and format a text box as follows to provide additiona l information:
- Near the middle of the slide, insert a text box containing the following text:
Plus many more historic homes in Santa Rita
- Change the font size of the text to 48 point.
c. Resize the text box to a height of 2.5″ and a width of 5.5″.
- Center the text in the text box.
- Change the fill color of the text box to White, Background 1 (1st column, 1st row in the Theme Colors palette) and the outline color to Black, Text 1 (2nd column, 1st row in the Theme Colors palette).
- Align the text box in the middle and the center of the slide.
- Apply the Offset: Center shadow effect from the Outer section of the Shadow gallery.
- Still on Slide 4, animate the text box as follows to ca ll attention to it:
- Apply the Zoom entrance animation to the text box.
- Change the Start setting to After Previous.
c. Preview the animations on the slide.
- On Slide 5 (title hidden), change the layout to Title Only to display the title at the top of the slide.
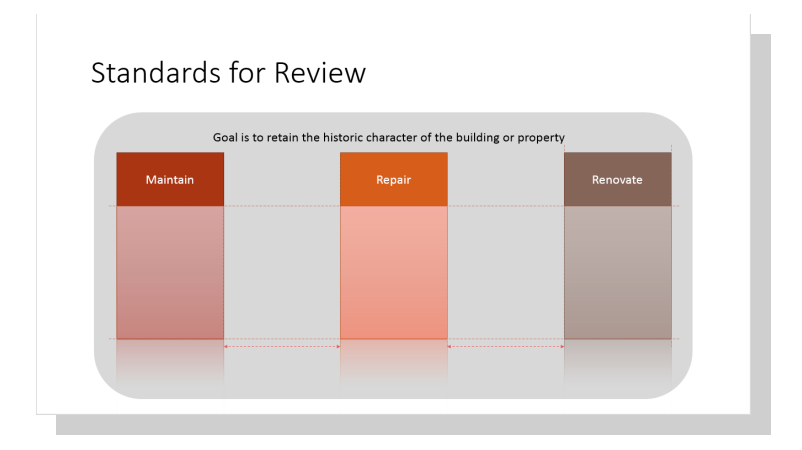
- With Slide 5 (“Standards for Review”) still displayed, modify shapes as follows to correct problems on the slide:
- Send the rounded rectangle containing the text “Goal is to …or property” to the back of the slide. ( Hint: Select the outer rectangle.)
- Enter the text Renovate in the brown rectangle.
c. Insert a Rectangle from the Rectangles section of the Shapes gallery.
- Resize the new rectangle to a height of 2.5″ and a width of 2″.
- Apply the Subtle Effect-Brown, Accent 5 (6th column, 4th row in the Theme Styles palette) shape style to the new rectangle.
- Apply the Tight Reflection: Touching shape effect from the Reflection ga llery.
- Use Smart Guides to position the shape as shown in Figure 1.
Figure 1: Position of the Shape
- On Slide 6 (“Approaches to Historic Properties”), modify the group of shapes on the left to improve their appea rance and complete the list of approaches:
- Flip the “Reconstruction” shape vertically to orient the text correctly.
- Copy the “Preservation” shape and paste the copy to the left of the “Reconstruction” shape.
c. Edit the new shape to use Renovation as the text.
- Change the fill color of the “Renovation” shape to Orange, Accent 3 (7th column, 1st row in the Theme Colors palette).
- Apply the Orange, Accent 3, Darker 25% (7th column, 5th row in the Theme Colors palette) outline color to the “Renovation” shape.
- Align the left side of the “Renovation” shape with the left side of the “Preservation” shape and align the top and bottom of the “Renovation” shape with the top and bottom of the “Reconstruction” shape.
- With Slide 6 still displayed, modify the Regular Pentagon shape on the right as follows to provide an illustration of a historic property:
- Fill the Regular Pentagon shape with the picture in the file
Support_PPT365_2021_CS1-3a_Mansion.jpg.
- Apply the Sharpen: 50% correction to the picture.
c. Change the color tone to Temperature: 8800 K to emphasize the warm tones in the picture.
- On Slide 7 (“Preservation Month”), change the slide title to make it more eye catching as follows:
- Apply the Fill: Orange, Accent color 3; Sharp Bevel WordArt style to the slide title text.
- Change the Transform effect of the WordArt to Chevron: Up from the Wa rp section of the Transform gallery.
c. Change the text fill color of the WordArt to Orange, Accent 2 (6th column, 1st row in the Theme Colors palette).
- With Slide 7 still displayed, insert a chart to illustrate the department’ s fundraising goals as follows:
- Use the content placeholder to insert a Stacked Column chart.
- Enter data for the cha rt as shown in Table 1. (Hint: Delete the extra column and row.)
c. Change the cha rt style to Style 2.
- Enter Fundraising Goals as the chart title.
- Change the font size of the chart title to 20 point.
Table 1: Data for the Chart
| Grants | Donations | |
| 2022 | 5,000 | 12,000 |
| 2023 | 7,500 | 19,000 |
| Goal for 2024 | 10,000 | 24,000 |
- Remaining on Slide 7, distribute the three rounded rectangle shapes horizonta lly on the right side of the slide.
- Still on Slide 7, complete the table below the shapes as follows:
- In cell Bl of the table (row 1, column 2), insert the web address
www.sr.cengage.gov as a hyperlink.
- Add a row to the end of the ta ble.
c. In the new row, enter Shirt or mug in column 1to indicate the gifts available for donating.
d. Apply the Medium Style 2-Accent 1ta ble style.
- Apply the Fade transition from the Subtle section of the Transitions ga llery to all the slides in the presentation.
- On Slide 1(“Historic Preservation Plan”), create a more dramatic transition for the title slide as follows:
- Apply the Peel Off transition from the Exciting section of the Transitions ga llery to the title slide only.
- Change the Effect Option to Right.
c. Change the Duration to 1.50 seconds.
- Check the spelling in the presentation to identify and correct any spelling errors.
In Slide Sorter view, your presentation should look like the Final Figure on the following page. Save your changes, close the presentation, and exit PowerPoint. Follow the directions on the website to submit your completed project.
