
GETTING STARTED
Save the file SC_PPT365_2021_CS1-3b_FirstLastName_1.pptx as
SC_PPT365_2021_CS1-3b_FirstLastName_2.pptx
o Edit the file name by changing “1” to “2”.
o If you do not see the .pptx file extension, do not type it. The file extension
will be added for you automatically.
To complete this Project, you will also need the following files:
o Support_PPT365_2021_CS1-3b_Education.jpg
o Support_PPT365_2021_CS1-3b_Headshot.jpg
o Support_PPT365_2021_CS1-3b_NewSlides.pptx
With the file SC_PPT365_2021_CS1-3b_FirstLastName_2.pptx open, ensure
that your first and last name is displayed in the presenter notes on Slide 1.
o If the presenter notes do not display your name, delete the file and
download a new copy.
PROJECT STEPS
- Your friend, Jabari Basha, is preparing to search for a new position as a web
designer. He asks you to help him use PowerPoint to develop a visual resume he
can send to prospective employers. Reuse the slides from the file
Support_PPT365_2021_CS1-3b_NewSlides.pptx and insert them in the
same order at the end of the presentation. - Change the design of the presentation as follows to use the theme and colors
that Jabari prefers:
a. Change the theme to Office.
b. Change the theme colors to Blue Warm. - Insert a footer as follows to identify Jabari throughout the presentation:
a. Include the slide number in the footer.
b. Enter Jabari Basha Visual Resume as the footer text.
c. Display the footer on all slides except the title slide. - On Slide 1 (“Jabari Basha”), enter Web Designer in the subtitle placeholder to
provide a subtitle for the presentation. - On Slide 2 (“About Me”), insert a picture as follows to add visual interest:
a. Use the content placeholder on the right to insert the picture from the file
Support_PPT365_2021_CS1-3b_Headshot.jpg.
b. Crop out the yellow rectangle at the bottom of the picture.
- With Slide 2 still displayed, format the bulleted list as follows to improve its
organization and appearance:
a. Delete the list item “Freelance web designer”, which is redundant.
b. Increase the indent of the list items “3 years in web design” and “2 years
in UX design” in the bulleted list.
c. Change the font color of the entire list to Blue-Gray, Accent 1, Darker
50% (5th column, 6th row in the Theme Colors Palette).
d. Bold the Level 1 list items (“Web designer”, “Highlights”, and
“Certifications”). - Remaining on Slide 2, animate the text on the slide as follows to make the
content more engaging:
a. Animate the content placeholder on the left using the Wipe entrance
animation.
b. Animate the text As One Object.
c. Change the direction of the animation to From Top.
d. Change the duration to 1.50 seconds to give the viewer time to read the
text. - On Slide 3 (“Professional Experience”), insert SmartArt as follows to make the
experience information more vivid:
a. Convert the bulleted list to the Horizontal Bullet List SmartArt from the
Convert to SmartArt gallery.
b. Change the SmartArt style to Moderate Effect. - With Slide 3 still displayed, add the following slide note (including the period):
References available upon request. - On Slide 4 (“Portfolio”), format the largest picture (titled “Sign Up to Become an
Affiliate”) as follows to suit the slide design:
a. Resize the picture to a width of 3.5″.
b. Align the bottom of the picture with the bottom of the Project 4 picture.
c. Align the right side of the picture with the right side of the Project 2
picture.
d. Apply the Simple Frame, White picture style. - With Slide 4 still displayed, modify the animations of the pictures as follows to
make them more consistent and smoother:
a. Apply the animation applied to the Project 4 picture to the Project 5
picture.
b. Select all the pictures and change the Start setting to With Previous so
that the animations play at the same time.
- Remaining on Slide 4, insert and format a text box as follows to provide
additional information:
a. Near the middle of the slide, insert a text box containing the following
text: See jbasha.cengage.com for more
b. Change the font size of the text to 36 points.
c. Resize the text box to a height of 0.7″ and a width of 8″.
d. Center the text in the text box.
e. Change the fill color of the text box to Blue-Gray, Accent 1, Lighter
80% (5th column, 2nd row in the Theme Colors palette) and the outline
color to White, Background 1 (1st column, 1st row in the Theme Colors
palette).
f. Align the text box in the middle and the center of the slide.
g. Apply the Offset: Bottom shadow effect from the Outer section of the
Shadow gallery. - Still on Slide 4, animate the text box as follows to call attention to it:
a. Apply the Fade entrance animation to the text box.
b. Change the Start setting to After Previous, and then preview the
animations on the slide. - On Slide 5 (“Skills and Achievements”), change the layout to Title Only to
display the title at the top of the slide. - With Slide 5 (“Skills and Achievements”) still displayed, modify the shapes as
follows to correct problems on the slide:
a. Send the blank rectangle on the right to the back of the slide.
b. Enter the text Awards in the white rectangle on the right.
c. Insert a Star: 5 Points shape from the Stars and Banners section of the
Shapes gallery.
d. Resize the new star to a height of 0.8″ and a width of 0.9″.
e. Apply the Light 1 Outline, Colored Fill – Blue, Accent 2 shape style
(3rd column, 3rd row in the Theme Styles palette) to the new star.
f. Apply the Tight Reflection: Touching shape effect from the Reflection
gallery.
g. Use Smart Guides to position the shape as shown in Figure 1.
Figure 1: Position of the New Star
- On Slide 6 (“Education and Training”), modify the shapes on the left as follows
to improve their appearance and complete the education and training
information:
a. Flip the “B.S. Business Communications” shape vertically to orient the text
correctly.
b. Copy the “2018” shape and paste the copy to the left of the “A.S. Media
and Design Technology” shape.
c. Edit the new shape to include 2015 as the text.
d. Change the fill color of the “2015” shape to Blue-Gray, Accent 1,
Darker 25% (5th column, 5th row in the Theme Colors palette).
e. Apply the White, Background 1 outline color (1st column, 1st row in the
Theme Colors palette) to the “2022” shape.
f. Align the left side of the “2015” shape with the left side of the “2018”
shape, and then align the top and bottom of the “2015” shape with the
top and bottom of the “A.S. Media and Design Technology” shape.
- With Slide 6 still displayed, modify the rectangle on the right as follows to
provide another picture of Jabari:
a. Fill the rectangle with the picture from the file
Support_PPT365_2021_CS1-3b_Education.jpg.
b. Apply the Sharpen: 25% correction to the picture.
c. Change the color tone to Temperature: 5300 K to emphasize the cool
tones in the picture. - On Slide 7 (“Performance and Contact Information”), change the slide title to
make it more eye-catching as follows:
a. Apply the Fill: Blue-Gray, Accent color 4; Soft Bevel WordArt style to
the slide title text.
b. Change the Transform effect of the WordArt to Warp Down from the
Warp section of the Transform gallery. [Mac Hint – Can Down.]
c. Change the text fill color of the WordArt to Blue-Gray, Accent 1 (5th
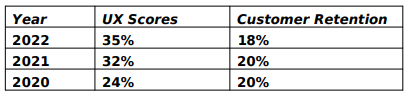
column, 1st row in the Theme Colors palette). - With Slide 7 still displayed, insert a chart to illustrate the improvements Jabari
made for his employers as follows:
a. Use the content placeholder to insert a Clustered Column chart.
b. Enter data for the chart as shown in Table 1. (Hint: Delete the extra
column and row.)
c. Change the chart style to Style 6.
d. Enter Improvements as the chart title.
e. Change the font size of the chart title to 18 points.
Table 1: Data for the Chart
- Remaining on Slide 7, distribute the three rectangle shapes vertically on the
right side of the slide. - Still on Slide 7, complete the table below the shapes as follows:
a. In cell B2 of the table (row 2, column 2), insert the web address
jbasha.cengage.com as a hyperlink.
b. Add a row to the end of the table.
c. In the new row, enter Phone in column 1, and then enter 312-555-8814
in column 2 to provide Jabari’s phone number.
d. Apply the Light Style 1—Accent 1 table style. - Apply the Wipe transition from the Subtle section of the Transitions gallery to
all the slides in the presentation. - On Slide 1 (“Jabari Basha”), create a more dramatic transition for the title slide
as follows:
a. Apply the Flip transition from the Exciting section of the Transitions
gallery to the title slide only.
b. Change the effect option to Left.
c. Change the duration to 1.00 seconds. - Check the Spelling in the presentation to identify and correct any spelling
errors. (Hint: Ignore names and other proper nouns.)
